Words and pictures (still and moving) by Brian Maffitt
The Perseid Meteor Shower is upon us, and last night I sat out for a few hours to take photos of the event.
Shooting meteors requires time, patience, a few critical tools and a little bit of luck. Forget holding the camera by hand… you’ll never react quickly enough to get a decent shot. In fact, to stand a chance at getting some good meteor photos we follow the same steps used to create a time-lapse movie.


Some things you’ll need:
Tripod – You’ll want something sturdy and able to point almost straight up if required. I use carbon-fiber Manfrotto sticks with a locking ball head.
Camera – You’ll need a camera that works OK in low light (hopefully without resorting to high ISO settings, which introduce noise), and one that can be operated in manual mode. This probably means a DSLR. I used a Canon 5D Mark III.
Lens – The most important thing here is to choose a lens with a wide aperture, f2.0 or better is preferred. This will allow the most light in and insure that short-lived meteors show up in your images. Next, choose the widest lens you have that fits within the first requirement. The wider lens will let you capture more of the sky. In my case I used a Canon 35mm f2.0 prime lens. In the past I’ve tried a wider lens (20mm) with a narrower aperture (f4) and while I was able to capture a wider field of stars with this setup, any meteors I saw were simply too faint to show up.
Trigger – A remote trigger or built-in intervalometer, to trigger the shutter in predictable increments. I use an inexpensive wired remote trigger for this (wireless is fine too, but the battery can’t fail on a wired device).
Battery and memory card – Make sure your battery is charged, and your memory card should have plenty of room (preferably empty). You will be taking hundreds, possibly thousands of pictures.
Suitable location – Get as far away from light pollution as you can. Dress comfortably and prepare to stay for a while. Use trees or other objects to your advantage to block out any intense light points (street lights, porch lights) that might cause flaring in your camera. In my case just moving as far away from my house as possible in my back yard, combined with turning off all of the lights in the house, worked OK. Of course, if you can get out into the country you will likely see a lot more stars, but it’s not completely necessary.
Chair – I prefer a lounge chair so I can lie back and get a good view of the sky, plus the lower position lets me keep an eye on the back of the camera so I can see what it’s doing.
Flashlight – For seeing things, setting manual focus, etc.
Dry, clean cloth – For wiping down the lens if necessary. It can get dewy out there.
STEP-BY-STEP
Inital settings: Once you have chosen a location set up the tripod and chair, preferably so you can access the back of the camera when comfortably seated. Set your camera to manual mode and choose a wide aperture (at least f2.0), a slow shutter speed (I used 15 seconds), and a “reasonable” ISO (I used 400, which was sensitive enough to see starlight but not so much that the image got too noisy). If your white balance defaults to daylight mode your images will look very yellowed, but you can try “auto” and see if the result looks OK, or enter a manual value like 3,300 to keep the sky a more natural dark blue.
To infinity, not beyond – Set your lens to manual focus and dial it to infinity. Important: Use a flashlight to do this since many lenses can focus “past” infinity and doing so will result in a fuzzy image.
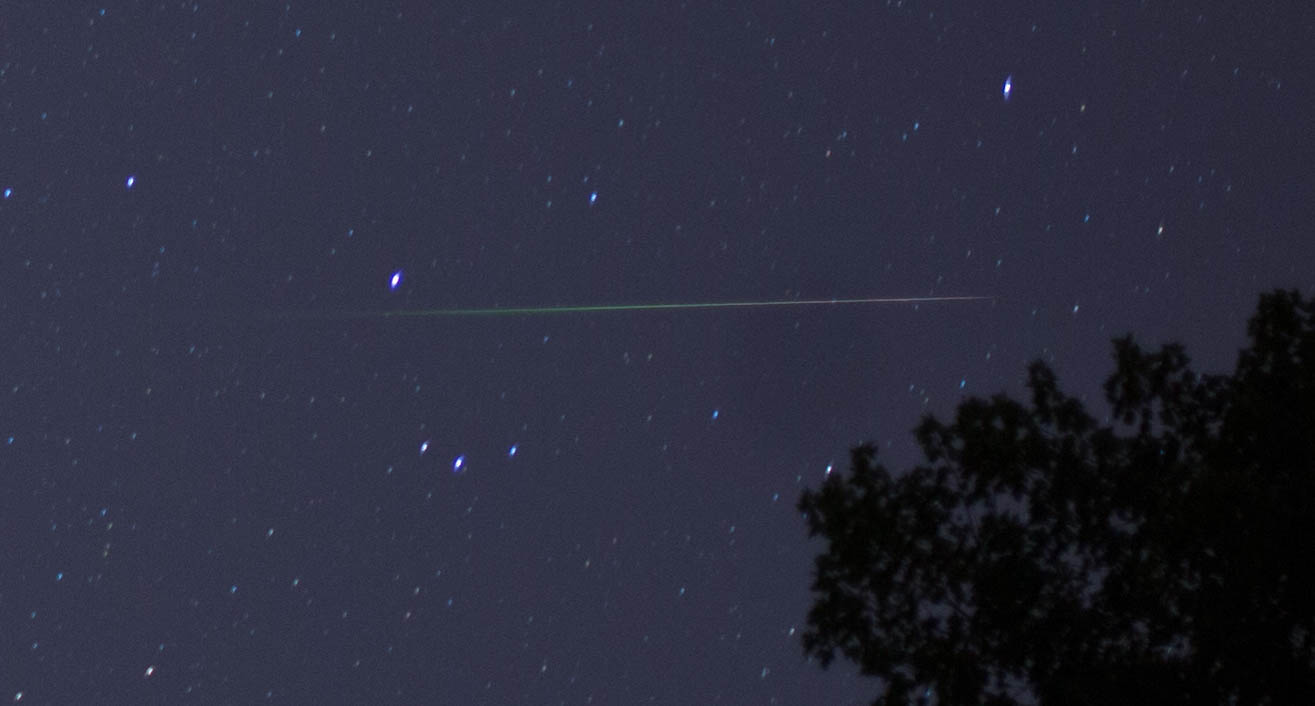
Test and tweak – Point the camera to an interesting part of the sky and take a test photo. Consider including some foreground element to frame the image and offer some perspective (I used some trees). Evaluate the exposure on the camera’s screen, then zoom way into the pic to evaluate the focus, and adjust your settings until you are satisfied with the composition, exposure, and focus of the image. Note: Depending on where you point the camera and the shutter speed, the stars may show up as little streaks or even lines. This is expected. Because of the rotation of the earth, the stars closer to the equator will produce the longest streaks, while stars near the North and South poles will hardly seem to stretch at all. You can compensate to some degree with shutter speed, but only to the degree you can open the iris or get away with higher ISO. Basically, streaks are an accepted artifact of star photography and the best decision may be to use them artistically.
Start shooting! – Once you are satisfied with the appearance and focus of the images, attach your remote (or set up your intervalometer) open the shutter and lock it. Most remotes have a way to lock the button into place, so when the camera finishes taking its long exposure, the camera will immediately (and automatically) take another one. Note: This is why you use Manual mode and not Bulb mode. Bulb will stay open as long as the button is pressed, and you will have to manually advance to the next image. With Manual mode and a wired remote, you can lock the button down and shoot until the card fills up (or the battery runs out). Obviously if you have an intervalometer, you can set it up to accomplish the same thing.
Relax – Sit back and watch the meteors. Enjoy the show(er). Resist the urge to stop and fiddle with the camera, since the joy of having a long, unbroken time lapse will outweigh any quick gratification you may get from “peeking”. If necessary, take a nap, or even go inside and return later to recover your equipment.
Aftermath – If all goes well your end result will be a long sequence of frames, all of which should be lovely, and some of which will contain flaming chunks of space rock. Import them into something like Lightroom where you can go through one at a time looking for a lucky capture, or import all of the images as a sequence into a video application and watch the whole thing play out as a movie. Or, as I did in my example–both!
Good luck and happy hunting!
Brian
BONUS VIDEO: Here is another, longer video I shot with the same settings on the next night, and published in 4K!
(Don’t be put off by the saturated thumbnail, the movie is real-color.)
